Wednesday 31 December 2008

Moodboard for Music Magazine

I decided I wanted to look music, I choose three fonts called KlingonBlade, Justus and Evanescent becuase I choose colours which were bright becuase it would need to attract consumers eyes. There are also many colours which I can choose from to ask people when doing my questionnaire.
. I have two images of Karrang magazine, drum set, Cds and money.

Sunday 21 December 2008

Evaluation

In what way does you media product use, develop or challenge forms and conventions of media products?
My school magazine challenges the form of convention by being a landscape magazine rather than portrait. This is because it suited the low angle medium close up shot I took. Due to it being a landscape front cover it appears to resemble a photo more than a magazine. The masthead is bigger than it would be on a normal magazine which challenges the convention I wanted the masthead to stand out which was also the reason why the model had green eyes. I have also not included a bar code due to it being a school magazine; the school does not have the facilities to scan the barcode and the students who will be purchasing it will not have to buy it. With all that has been said which challenges the convention there are the normal elements that would be in a magazine such as covelines and it has a sell line. The fact that it does not have a issue number also challenges the convention of magazines; the reason for this is there wasn’t a need to have one for a school magazine in my opinion as it is not something consumers would want to keep track of in case they missed a issue or wanted to browse for a specific issue. The contents page does not contain any images and uses one type of font. This challenges the conventions of magazines as the contents page normally has images showing topic which will be shown in the magazine. I have used page numbers to direct the audience on what type of editorial content will be shown on that specific page. The colours which I have used on the content page are the same as the colour scheme used on the front cover. I did this to keep a relationship between the front cover and content page.

How does your media product represent certain social groups?
I think the target audience for my magazine will be students who are entering the school as it contains certain items which appeals to them such as the school map or clubs/activities which they can join. The parents of the students may be interested in the magazine but it is mainly for the students to get an idea of what the school has to offer and the views the students who have been there for a while have. Parents may be interested in the magazine to see where they can purchase the uniform or to see what other students thought of the school. What kind of media institution might distribute you media product and why? A school would distribute my magazine due to it being a school magazine specially made for that specific school. They would distribute the magazine on a term or year basis. This is because I don’t think a school would be able to run a weekly magazine that was free so a term or yearly one would be more convenient and affordable for them.
Who would be the audience for your media product?
The front cover of the magazine shows a person about the age of 15 upwards; this was used to exclude people beyond that age as it is aiming for a specific age group. I wanted to show that the school was one which allowed students to be an individual which is why the person on the front cover is not wearing a uniform.

What have you learnt from technologies from the process of constructing this product?
I have learnt that in order to make things stand out the use of computer programmes such as Adobe Photoshop help this to happen i.e. the green masthead and green eyes which was included to help the masthead stand out. Although I did not use other tools such as the Magnetic Lasso Tool when doing other practice tasks I found that they could be very helpful in removing some unnecessary things which are included or things which you don’t think suites the image. Overall I think I have learnt that editing is a key feature which help the overall product look good and takes the most time for this process to happen.

Monday 8 December 2008

Plan for content page


This is my plan for my content page. I have written out what will be incluided into the content page and explained the desgine in the below box.

Tuesday 2 December 2008

Analysis of magazine cover NO2


This layout is very different to the other magazine but I like it as it is interesting and reflects the words written in the sell line “Transformation of dreams into reality” this is written in a Sans Serif font in a pale yellow colour. The background could look like an illusion which supports the sell line as illusions are similar to dreams. The way that all the images are put together help contributes to the illusion/dream. I think this is a good technique and is something I would really considering putting in my magazine. I think it is unusual and really affective. This could be done to demonstrate the way dreams are processed through the mind and how they are short and jumbled together.
The masterhead is written at the bottom of the page and goes through all the lines of third. I like the way the “I” is bigger than all the other letters and has blue in it, while the “Can” is written in black and the “Vas” is see through. I also think it is interesting the way they have used three different fonts to make up the masterhead. The “I” is written in a Sans Serif font, “Can” is written in a Serif font and “Vas” is written in a script font. Although I like the way this is written using three different style fonts, I do not think I will incorporate it into my magazine because I think two different types of fonts will look better. For the effect I believe this magazine was trying to pull off I think the use of three fonts is good.
There are no cover lines or main cover lines which relates to the sell line as dreams do not always clear and you are not aware what will be featured in them, it is similar to a movie you have not seen before. Depending on the type of magazine I will do I might decide to use this technique because it is very different and I like it. You can focus more on the image instead of having text disrupting it. My main concern with this is it may not attract as many people as it could of because it does not show the reader what to expect and without knowing this valuable piece of information it may lose customers instead of gaining them. I think people want to know what to expect rather than be surprised. I think the front cover gives a sense but it is still broad and anything could be side. I would guess that this magazine would be a image based or advertisement magazine because of the lack of text but that would be my assumption and someone else’s may be very different as it is personal.
This is an intrinsic magazine as anybody could read it; I don’t think there is any particular target audience. I think this is the type of magazine that if it interests you then you will want to see what is inside based on what you see on the front cover without knowing any issues or articles that will be inside.

Analysis of two school magazines NO1


I like the layout of “Next” magazine because it is simple but effective. The masterhead is written in a san serif font; using a sans serif font makes the words clear and also contributes to them standing out. The text in the masterhead goes through all of the squares in the rule of third taking up 1/3 of the page. I think this is effective because the text is clear, big and catches your eyes immediately. I think when I come to do my magazine I may use this technique as I think it is a good way to attract a audience. The colour scheme makes the magazine appear less formal and more appealing to a younger audience. The colours used in the masterhead are yellow, black and blue. I don’t think I will use these colours in my magazine because they are not appealing to me and it also depends on the type of magazine I will do and what my aim is to achieve and attract an audience.
The sell line is written in a sans serif font, in black and is highlighted yellow “Your future after high school in Florida” having the sell lone highlighted yellow could be a way of showing the reader that the masterhead is linked to the sell line and is a way if attracting an audience. The sell line is also exclusive because it is aimed at people at a certain age. The sell line is positioned under the masterhead. I don’t think I will highlight my words because I don’t really like the way it looks and I think it overpowers the words.
The text on the cover line is written in white but the key words are written in another colour and this consists of green, yellow, blue, yellow and red. The shade used for these words are a light one except the red which is at the bottom, this could have been done to show that although it is positioned at the bottom it is the most important issue. I might use the colour change in the cover line because I think it is a good way highlight key parts especially if they involve different things. I also like the way it makes the magazine appear joyful and makes you as the reader want to read it. It uses a serif font which is different to the masterhead and cover line of the magazine. The other texts, which are written in various parts also uses a serif font. I like the idea of uses two different fonts because it helps the words stand out and helps the magazine look interesting.
The date line is written at the top of the masterhead, in a smaller font, I like the use of it at the top because it stops it looking plain and boring and attracts the audience’s attention upwards.
The bottom left third has some text written in Spanish which makes it exclusive “Loalo espanol”. You would only know what this means if you spoke Spanish, and I think it also depends on the dialect of Spanish you speak as there are different words for things depending on where you are from.

Monday 1 December 2008

content page

This is the first content page I did; I thought the colours, font and layout was really good and I liked it however it was portrait and the front cover of my magazine was landscape so I did it again (as you can see below). I changed the colours on the other version becuase I wanted it to match my magazine front cover. The reason for three of the text being white while the others are green is becuase I wanted to highlight them as they are the coverline which was shown on the front page.


I used Adobe photoshop to create my content page. I used the techniques I have previously learned from doing my banner and logo to create the actual page which it is on. I also used the skills I have aquired from downloading fonts to use as the font for the editorial context of the contents page. I looked at my previous work and tried to make it similar to what I have already done in order to keep a theme running through my work. Before I actually made my content page I created a plan which gave which provided me the basic layout whcih I wanted to create and allowed me to see how it would look when it was actually made. I l like my contents page becuase it is simple and in my opinion clear. I think that it also shows how all my work is similar and I use skills I have already leart and encorperated it into a different task. Some of the writing is in white and that is becuase it is related to the front cover. In the coverlines I wrote some text about what will be featured in the magazine; by making these pieces of text a different cover I am trying to make the reader aware of the artivcles that are included from the front cover. All the colours that are used in the content page was used in the front cover. I made it landscape because my magazine is an landscape magazine.

Friday 28 November 2008

Logo and Banner

Banner
Logo
I used Adobe photoshop in order to create my banner and logo. I used a similar design and colour to create a theme for my work. I used the Fresh_Foliage brushes. I changed the size of the canvas; for the banner and logo I used A4. When creating the logo,I made my canvas black by clicking on the paint icon whcih is shown in this picture. It is the one that looks like a paint bucket. I used the colour black, then using my paintbrush I created the image I wanted. For this i used the colour white. To create the blue highlight i changed the hue and satutration.

Magazine Front Cover


I first took a picture for my school magazine then created a plan. As you can see on the plan I have a layout which I am planning to use and some annotations.


To make a magazine front cover I used Adobe photoshop. I first took my image using a camera; it specified on the intructions it had to be a medium close up for a school magazine. I decided I would a high angle shot for my medium close up.


This is my original image before editing.


This is my actual magazine copy. To create this using Adobe photoshop I used airbrushing with the model's eyes; from the original colour brown I made them green. I then added text onto the image suing the text tool. To use a font which I thought I would download a suitable font to make my magazine unique. I used two different fonts Sans Serif and a Serif font. The reason for my image being landscape is beacuse I wanted to create a different type of magazine then those that already exist to add to my unique image. Due to it being a school magazine I wanted to keep it simple and ordered reflecting the way a school is run. The colours I used stand out in my opinion and are all related to the orignal picture.


Thursday 13 November 2008

Colour Blending

Colour Blending
The next editing I learnt was colour blending and this is used to highlight the picture or add colour to it. This is useful as it makes a picture stand out and I added some text to tell the audience what the picture represents.
To do Colour Blending I used Adobe Photoshop,
1) Select a image and open it in Adobe Photoshop
2) Add a new layer
3) Click on circle icon that is half black and half white and change Hue and Saturation
4) Change layer eg soft light
5) Click on the pencil icon and select a paintbrush, then click a hard brush
6) Choose colour and paint over image the way you want
7) Click on filter and select Gorussion blur, change to 80-90
8) The image is completed.
The first picture is the orignial image and below it: shows how I used the steps shown above to add colour onto the image. The colours I used were blue, purple, green, pink and yellow. I used a water style brush to colour over the image in each colour.

Airbrushing

Airbrushing
Airbrushing is the next thing I learned, this is used to hide any or change any parts of the picture you are unhappy with. To airbrush I used a program called Adobe Photoshop,
1) Save the image you want to use and open it in Adobe
2) Create a new layer by clicking
3) Click on the pencil and go to the paintbrush icon
4) Choose the colour you want to use and colour over it
5) Change the layer eg Overlay or any other depending icon what you want
6) To paint over another part create a new layer and follow the steps you have already done.

The first image is the original one and the one below is the one where I did the airbrushing. As you can see the hair, eyes

and lips have be changed. I chosse to use these colours becuase it makes the image stand out and I was not looking to create a natural look but an artifical one. As this was my aim I think I did that well.
I decided that I would use the same picture and airbush this one creating a more natural look. I changed the hair and eyes to brwon. I decided that it would be better if I used two different shade; meaning the eyes are a lighter shade of brown then the hair. I then changed the layer to give me the affect I was looking for.
Out of the two my favourite is the un-natural look becuase I found it more intresting and fun to create. I thought about waht colours would stand out but look well together and I think I was able to capture that.


Colour Filtering

Colour Filtering
The next thing we learnt about was colour filtering; this is used to take away any unnecessary things in the pictures. The reason for doing this is to make the location the way you want it to be by editing out things which should not be there. To do this I used Adobe Photoshop
1) Select the image you want to use and open it in Adobe
2) Create a new layer by clicking
3) Click on and change Saturation
4) Click on the pencil and go to the paintbrush icon and click on the colour replacement brush
5) Click on the background layer and shade it in the colour you want it
6) Add a new layer if you want to insert text
7) Sometimes cropping may be necessary and to do this click on and crop out the bit you do not want shown in your image
This is the picture before it was edited using Adobe Photoshop.
This is the image after editing has occured; looking at this you should notice that the grey wall is no longer present.


Fonts

Fonts
There are different types which are called Sans Serif, Serif, Decorative and Script style, each font creates a different affect to a word when used. Fonts can be used to make a brand recognisable or to create a impression on what type of product it may be.
1) Click download (Some websites have a different select button for Mac or Windows) click the appropriate one.
2) If a winzip folder comes up open it otherwise just click open on the window that comes up for downloading the font.
3) Go to my computer and open the C:drive, then go to a folder called windows and open it up, then inside that folder look for another called fonts
4) Once the font folder is opened copy, drag or paste the font file ending in TTF
5) The font should be downloaded if not then restart the computer
This is a Sans Serif Font, This type of font is clear, it can be identifies as being a Sans Serif as it does not have any typeface at the end of the letters; which is a small line which extends the letters. Sans means without and that is how you can tell the difference through name.

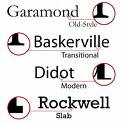
This is a Serif font. The lines at the end of the letters is the reason for it being a Serif font. Serif fonts are used to make a slight emphasis on the word.

This is a decorative font, it can be used to represent a product or symbolise a event. They are used to make something such as a magazine cover unique whether it was done to make it personal or it represents a theme eg christmas magazine.

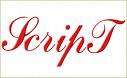
A script font is used to make a product appear more elegant. It can be identified as being italic.

Monday 10 November 2008

What I have learnt in Media Studies


In media studies I have learnt about denotation, connotation and Mise en scene, and why they are different. The denotation is everything that you are able to see in the picture meanwhile the Mise en scene goes into detail about what is in the image. It focuses on camera angles, lighting, props, costume and story of the image. Connotation is making a connection between objects and what they represent.
There is a woman dressed in purple; she has blonde hair and crystal blue eyes. Near the bottom the word “Tekken 6” is written in black and around it something is written in another language. It is most likely Japanese as “Tekken” means open hand in Japanese. There is also white writing in a smaller font which says “Namco Bandai games inc 2007games” “Namco Bandai” is written in capitals which could indicate it is important and could stand for the name of the game company.
As the white writing says games we can assume the background and image is computer generated. this is also shown by the fact that the background and lighting appear to be artifiial due to the shape it has formed and the postioning of the light onto the female body. It is a medium close up shot as we can only see the upper body of the woman. There is a light shining forward as we can see her arm displaying a line of light and between her two arms in the middle shaped like a circle the shade of purple is lighter. The woman is wearing purple clothing which might be the reason why the background colour is purple to emphasise that the image is about her and not the text written at the bottom because red is a bolder colour than purple. One of the possibilities of it written in red is it could be the signature colour for the game. It looks like she is wearing an outfit which could be a purple army suit because of the splotchy design around the body. From her clothing we could assume she is a fighter of some sort which may also be the reason why the text behind the “Tekken6” is written in red.

Introduction to my Blog

In Media Studies we have been learning how to use Adobe photoshop in order to change the way the image looks. This includes Airbrushing, adding text onto a image to name a few. We have learnt these skills in order to do the coursework. Before the actual coursework we did mock up one which was to create a magazine front cover for a school and a contents page. This gave us some idea of what we would be expected to do for the real task.
We were not able to always take images off the internet; which meant we learnt how and when certain photshots would occur and whether we would use flash or not. We learnt the names of different shot types for example long shot or middle shot; the names of angles and what effect it gives to your image for example high angle- This makes the person in the image appear to be inferior.